
Air layering is probably the only way to clone a Bonsai or your favorite fruit tree that is not true to seed. But getting it done right can take some skills.
Most air layering attempts fail because of improper ring barking or girdling, inappropriate temperature, wrong or insufficient growing medium, the use of a clear sleeve, improper sealing, and a lack of patience.
In this article, we will look into these 6 reasons why many have failed and also how to succeed in cloning your plants using this important technique.
1. What is Air Layering
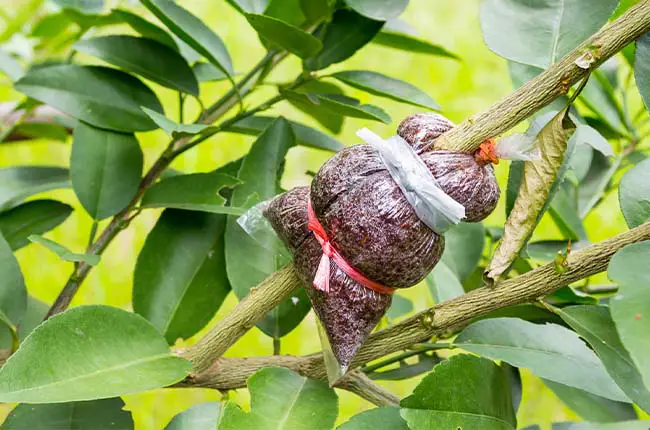
Air layering, also called “marcotting”, is a propagation technique to produce clones of a woody plant by inducing roots on a branch that is still attached to the parent.
The technique entails putting some moist, water-retentive medium, such as peat moss, coir, or compost, around the cut area of a branch and wrapping some waterproof material on the outside to trap moisture.
After at least a few months when roots develop in the peat moss, the clone or marcot is removed from the parent plant and potted up as a new individual plant.
Air layering is different from the grafting technique, which involves combining two plants into one to create more genetic varieties.
2. Common problems with air layering
Most of the failed air layering or marcotting attempts have the common feature of callus outgrowing the cut area of a branch with no sign of roots.
It is normal to form callus, which is thickened cambium layer cells, as a natural self-healing mechanism over a cut wound. But it is important that the callus does not completely block the cut area. If the callus covers up the cut area, new roots will not develop.
Apart from callus, sometimes mold and fungus may also develop in your air layer and feed on the plant.
3. Why does air layering fail?
3.1 Poor ring barking or girdling
The presence of callus outgrowing the cut area is most likely because the ring barking or girdling procedure was not made wide and deep enough.
Ring barking or girdling refers to removing the bark of a tree, which consists of the cambium layer, phloem, and occasionally xylem.
For air layering to be successful, the removal of the bark including the cambium layer and phloem of the cut area must be made wide and deep enough.
Removing the cambium layer is to prevent the tree from healing itself, that the bark below and above would not heal across the wound and that roots can begin to form.
Removing the phloem is also to prevent carbohydrates and auxins (an important growth hormone for root formation) from reaching down the tree trunk so that they will gather around the wounded area and facilitate root formation.
In some instances, a deep cut that tampers with the xylem can also result in a failed air layering process. Removing the xylem which is responsible for transporting water and nutrients up the tree would prevent the tree from getting the required nutrients to stay alive.
3.2 Inappropriate temperature
Temperature plays a critical role in most plant processes such as transpiration, respiration, and photosynthesis.
When the temperature is high, the area you air layer and the growing medium can lose moisture quickly, thus making it hard for roots to form.
On the other hand, under low temperatures for example during frost, the parent plant can experience low enzyme activity which affects its ability to take in nutrients. When the parent plant does not receive adequate nutrients, the probability of your air layering procedure in producing roots reduces.
3.3 Wrong or insufficient growing medium
A growing medium plays the role of maintaining and providing moisture to encourage root growth.
Plain soil is normally not the best growing medium for air layering because it will lose moisture quickly.
3.4 Use of a clear sleeve
A clear sleeve allows light to pass through and thus provides an ideal condition for a variety of fungi and mold, such as Beard Lichens, Barnacle Lichen.
The mold and fungi can thrive inside the growing medium and infect the cut area, thus lowering the success rate of air layering.
3.5 Improper sealing
Leaving small openings on either end of the plastic bag may attract ants. The ants can make a nest in the air layer and poke holes in the plastic bag.
Improper sealing can also let out moisture and affect root formation.
3.6 Lack of patience
Propagating plants using the air layering technique requires a lot of time.
Any rooting under 6 weeks is very quick. If you check too early and frequently by removing the rooting medium around the cut area, you can be breaking the formation of fine roots and set back the process.
If you attempt to re-scrape the xylem and rewound the callus later on, it is likely that the best time for air layering has passed and such attempts would therefore not succeed.
It is best to just leave it after performing the procedure and not disturb it until at least the next season. When you start seeing white “bulges” coming from the cut, that will be the beginning of roots.
4. How can air layering be done successfully?
Tools required
- Snippers
- Knife
- Rooting hormone (not necessary, but it’s a plus to have)
- Waterproof tape or a strong string
- A plastic bag or polythene film
- Sphagnum moss or another growing medium
Procedure
Step 1: Pick a strong branch
Pay close attention and feel your tree’s branches, especially the older ones (about one and a half years old). A strong stem is usually flexible and has new growths throughout.
Step 2: Prepare growing medium
If you use sphagnum moss, moisten it first by spraying it with water.
You can also use other types of media such as potting soil, but you will have to mix 75 percent of peat moss with 25 percent of potting soil to increase the water retention capability.
Perlite is another ideal growing medium you can employ for the procedure.
Step 3: Trim and make incision
Now that you have picked a branch, trim the leaves and shoot around a target area of around 12 – 15 inches (30 – 38 cm) in length.
Make an incision about 1 to 2 inches (2.5 – 5 cm) on a shoot in the target area. A shoot will lead to quick root formation compared to a plain site on the branch since it’s already developing.
You can apply rooting hormone to your incision, but it isn’t necessary.
Step 4: Apply growing medium
Wrap the damp sphagnum moss around the cut area. It should be around 3 – 4 inches (7 – 10 cm) thick.
Cover the soil medium with plastic wrap to prevent moisture from escaping and to keep out the rain.
Using waterproof tape, seal both ends of the plastic bag, and then check that it is firmly in place and that there are no openings, no matter how small. These small openings can let in the ants and lead to moisture loss.
Step 5: Wait and observe
When you start seeing white “bulges” around the wrapped area, that would mean new roots are taking hold of the growing medium.
When you notice roots developing, you can cut the section from the parent plant and transplant it into a pot.
In addition, you should always be on the lookout for mold or fungus, as they will negatively affect your project.
Do not forget to expose your plant to adequate sunlight and occasionally mist the growing medium to moisten it.
5. How long does it take to grow roots?
Depending on the tree and the species, some may take up to a year while others will grow roots after weeks.
For instance, lilacs and grapes can develop roots within two weeks after air layering, while an apple tree can take eight months., and a Juniper can take even over a year.
Generally, don’t expect anything to happen in under 6 weeks.
6. Benefits and disadvantages of air layering
Benefits of air layering
- Quick and strong root development
- Produces identical copies of the parent plant
- Plants realized by cloning have a high success rate
- The procedure doesn’t harm the parent plant
- You can produce full-grown trees within a short time (months), not years when starting from seeds or seedlings
- Minimal risk involved compared to other plant propagation techniques.
Disadvantages of air layering
- It involves a lot of work, especially during the initial phase
- Requires good understanding to realize results
7. What plants can be air layered?
- Star fruit
- Rambutan
- Pomegranate
- Plum
- Persimmon
- Pear
- Peach
- Papaya
- Mango
- Boxwood
- Loquat
- Kiwi
- Fig
- Citrus
- Cherry
- Avocado
- Apricot
- Apple
- Almond
Complex plants to air layer
Many plant species respond well to air layering. However, some don’t respond as well, for example:
- Camellia
- Daphnes
- Jasmine
- Forsythia
Conclusion
Achieving success with air layering is not difficult. It requires removing the entire cambium and phloem layer, using an adequate root growing medium, keeping the growing medium moist, and patience.
Happy gardening!
Related
4 Effective Ways to Promote Aerial Roots (Explained)
Top 12 Fruits That Grow True To Seed
References
Chhonkar, V. S., & Singh, R. K. (1969, June). Propagation of Mangifera indica L. by air-layering. In Symposium on Mango and Mango Culture 24 (pp. 89-92).
Went, F. W. (1953). The effect of temperature on plant growth. Annual Review of Plant Physiology, 4(1), 347-362.
Sugawara, S., Mashiguchi, K., Tanaka, K., Hishiyama, S., Sakai, T., Hanada, K., … & Kasahara, H. (2015). Distinct characteristics of indole-3-acetic acid and phenylacetic acid, two common auxins in plants. Plant and Cell Physiology, 56(8), 1641-1654.
Myburg, A. A., & Sederoff, R. R. (2001). Xylem structure and function. e LS.

- Top 6 Drip Irrigation Systems for Raised Beds (2025) - January 31, 2025
- Top 10 Orchid Fertilizers: A Comprehensive Review (2025) - January 16, 2025
- Top 6 Slow-Release Fertilizers for Houseplants & Veggies (2025) - January 15, 2025