
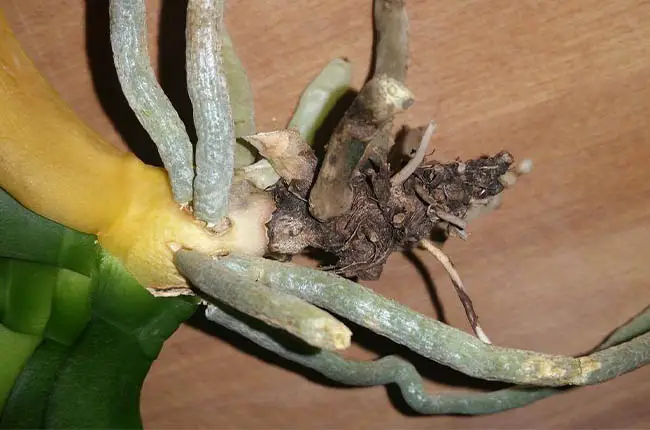
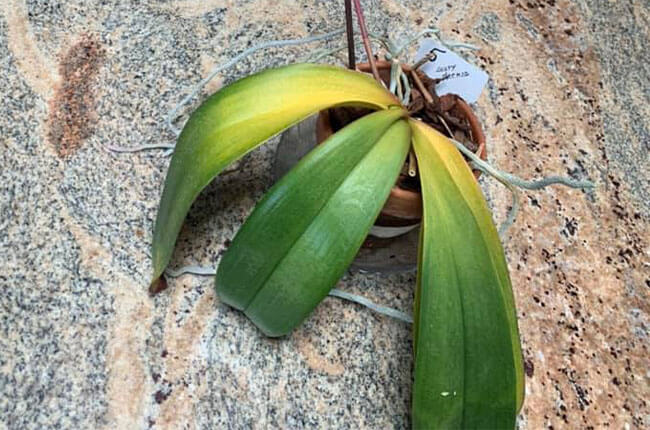
We all have experienced the shock of witnessing our healthy-looking orchids die suddenly and rapidly within a matter of days. It starts with a leaf or two turning yellow overnight. A close examination can reveal a darkened area of infection eating into the side of the stem. And the next thing we know is leaf drop or worse the whole stem just breaks off, leaving a black stump with roots.
Stem rot causes an orchid to lose its leaves and is a major cause of death for orchids, apart from root rot and crown rot.
Can you save an orchid with stem rot?
To save an orchid suffering from stem rot, you should stop the infection from spreading to other parts of the stem immediately by removing the infected area and sterilizing the affected area.
This article will help you understand the cause of this killer disease and help you prevent it.
Stem rot vs Crown rot: Symptoms compared
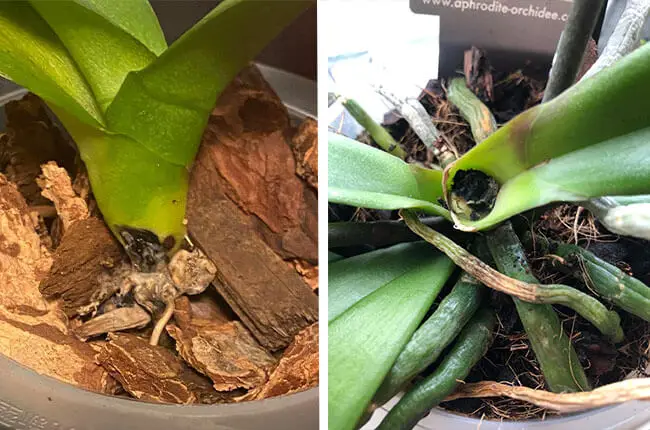
Both stem rot and crown rot manifest in the infected area turning black, mushy, and spreading quickly. Both are caused by an infection due to fungus or bacteria.
A major difference between the two is that stem rot affects any point of the stem, but the top leaves, i.e. the crown, are in good condition; As for crown rot, the top leaves are infected at the base and fall off while the stem is in good condition.
Sometimes, a plant can suffer from both crown rot and stem rot.
Another difference is that crown rot can be treated quite easily with a high possibility to save the orchid. You can remove the top leaves, and disinfect the upper core area to keep it dry. Although the orchid would not be able to produce new leaves, it can continue to produce roots and reproduce by growing a basal keiki.
But with stem rot, you would have to remove a leaf, sometimes more than one, to reveal the infected blackened area of the stem underneath. If the infection is in the bottom part, new roots, leaves, and spikes cannot be produced. Also, it would be harder to keep the infected area dry.
Causes of orchid stem rot
The primary cause of stem rot is incorrect watering frequency and watering habits (e.g. watering from above, misting).
This increases the chances of water getting trapped in the joints or crotches of leaves around the stem which favors the accumulation of bacteria and fungi and weakens the cuticle of the stem.
Normally, the cuticle on the outer layer of the stem or a leaf protects the plant against bacteria, fungi, or any pathogens, so that water can just slide off the leaf.
But, when there is a constant accumulation of water at the crotches of the leaves, the cuticle can be weakened and become vulnerable to the entry of pathogens.
The possibility of stem rot increases when the orchid is potted too deep into a water-retentive media such as sphagnum moss, when there is poor air ventilation and low temperature that does not favor the evaporation of water.
Stem rot affects only monopodial orchids (e.g. Phalaenopsis, Vandas), and not sympodial orchids because leaves grow from one stem and there are many leaf joints where infection can happen.
Can you save an orchid with stem rot?
Stem rot is very hard to treat because it is hard to know where the pathogens enter the stem, unlike crown rot or root rot.
If we do not know the entry point of the pathogens, it is hard to know where to treat them. Since the stem is covered by the sheaths of leaves, you cannot peel off leaf after leaf to apply the treatment.
When pathogens enter the plant, they can spread rapidly either up or/and down the stem, and then the leaves around the stem. The leaves first turn yellow, orange from the base and then blacken and eventually drop.
Once an infection is located, it must be treated immediately before the pathogens spread further.
How do you fix stem rot on orchids?
Even though stem rot is hard to treat, you can still try the following.
1. Remove the sick parts
Unpot the plant to remove the infected parts immediately. Such parts can be a leaf that has turned yellow at the base.
Instead of waiting for the entire leaf to turn yellow for it to drop naturally, it should be removed immediately using sterilized cutters. If not, the pathogen will rapidly spread to the other parts and kill a healthy growing plant in a matter of days.
To remove a sick leaf, the easiest way is to split it down its length and work the halves off. Go very slowly. You may need to use tweezers to remove some of the parts remaining on the stem. Dab the cuts with cinnamon powder to disinfect.
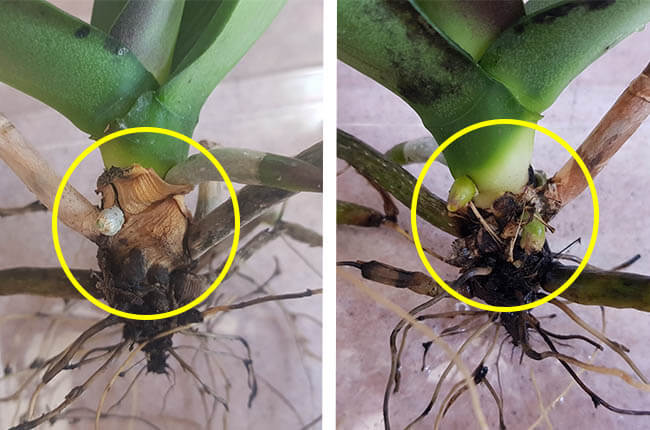
2. Remove sheaths around the stem
After a leaf is removed, the sheaths remaining around the stem should also be removed.
These sheaths can obstruct any new root tips as they come out. Also, they provide a place for moisture, fungus/bacteria to accumulate, especially when there has already been an issue on that plant.
3. Disinfect and sterilize
Spray the infected area with fungicide Physan 20. Also, sterilize the used pot in bleach water in case the pathogens have already spread elsewhere.

4. Dab the infected area with cinnamon
Use a Q-tip to dab cinnamon powder (which you can buy from the supermarket) on the infected area to dry up the treated area.
Let the plant dry bare-rooted at room temperature for half a day.

5. Repot in clean media
Pot the orchid in clean fresh media. Be careful not to use water-retentive media, such as moss, on the top layer, and do not bury the stem too deep into the media.
How to prevent stem rot?
Although it is hard to cure stem rot once it happens, there are many ways you can prevent it from happening.
1. Do not bury the stem of your orchid too deep in the media. The leaves and the leaf joints should stay above the media.
2. Grow your orchids in a well-ventilated area with some gentle air movement.
3. Prevent water pooling on the leaf joints. Prevent misting or watering from above. Try to water from the bottom by soaking. If there is water at the joints, use a paper towel to dry it.
4. Prevent retaining too much water around the base of the stem, due to an inappropriate choice of growing media.
5. Finally, the best preventive measure is to nourish your orchid well, especially with sufficient Calcium during the active growing season from the end of winter to fall, using a Cal-Mag solution. Calcium is an important nutrient for the plant to make new cell walls as it is putting out new structures. Without enough Calcium, the leaves and stems are more vulnerable to die back or rot.
Conclusion
To sum up, the best approach to stem rot is to change watering habits and prevent water from getting trapped in the joints of the leaves, especially in a poorly ventilated growing area with low temperatures. Check your orchids daily. If a leaf begins to yellow from the base, remove it immediately and the sheaths and sterilize the infected area before repotting it in fresh media.
Happy gardening!
Related
Should I Soak My Orchids? (How To Do It Correctly)
Saving A Rootless Orchid? (3 ICU Setups You Should Know)
Saving A Leafless Orchid: The Ultimate Guide (Pictures)

- Top 6 Drip Irrigation Systems for Raised Beds (2025) - January 31, 2025
- Top 10 Orchid Fertilizers: A Comprehensive Review (2025) - January 16, 2025
- Top 6 Slow-Release Fertilizers for Houseplants & Veggies (2025) - January 15, 2025