
It can be frustrating to propagate rose cuttings. Even though new leaves have grown, they can still turn black and rot.
What could be the problem?
Cuttings that have turned black from the bottom or from the top are both infected by the Black Spot fungus (Diplocarpon rosae) which can spread easily in warm, humid weather. It can only be eliminated by the use of fungicides. Letting the cuttings callus first before planting can reduce the risk of infection.
In this article, we will learn more about this fungus, the type of chemical and organic fungicide you can use, and how to properly propagate your cuttings.
The problem: Black spot fungus
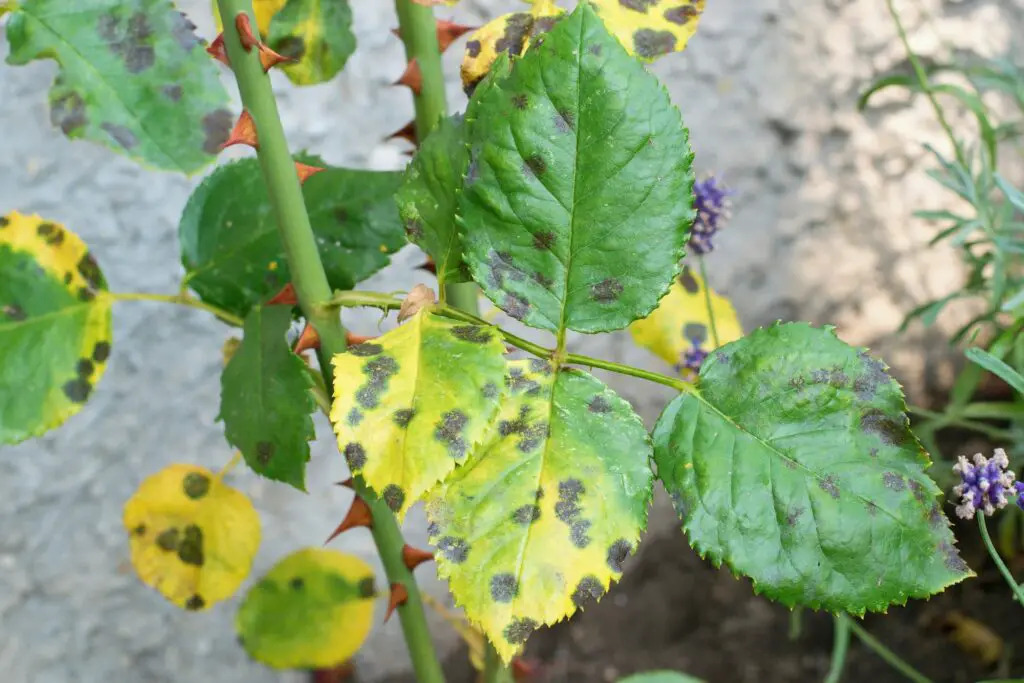
Roses are vulnerable to the attack of the Black Spot fungus (Diplocarpon rosae), especially when there is an open wound.
It not only infects stems, but also leaves, flowers and fruits. And it can infect any plant (e.g. hydrangea, tomatoes, orchids), not only roses.
When a stem cutting is infected, it can turn black from the bottom as well as from the top because the fungus is airborne.
When a leaf is infected, the leaf margins first turn yellow which then spread to the entire leaf. Black spots will then appear and can be up to 1/2 inch (1.5 cm) in diameter. The infected leaves will eventually drop.
The Black Spot fungus does not directly kill the plant, but it depletes the plant’s energy and thus affects flowering.
The fungus is most active in warm temperatures ranging between 68-85F (20-29C) and humid weather conditions. It stops growing and spreading when it gets above 90F (32C).
Plants are thus most vulnerable to fungal infection in late spring and early fall or other periods with such weather conditions.
The fungus reproduces asexually and spreads quickly to plants or plant tissues nearby by wind or by water, such as raining or water staying on the leaf surfaces for hours.
It can overwinter in the infected tissue and the hyphae of the fungus can burst out and attack plants in spring.
If a plant in your garden had this infection before, the spores are probably still around and can attack other plants when its growing conditions are met.
What to do?
1. Use fungicide
The most effective and probably only way to completely eliminate the Black Spot fungus in your garden is to apply a fungicide.
Chemical fungicides contain active ingredients such as Propiconazole and Mancozeb to kill the Black Spot fungus.
Organic fungicides can be copper-based, neem oil, or lime sulfur.
Fungicide product | Feature |
BioAdvanced 701250 Disease Control  | - Chemical fungicide - Propiconazole as active ingredient |
Bonide 775 Copper Fungicide  | - Organic, can be used on fruits and vegetables - Contains Copper Sulfate 7.0% |
Bonide CAPTAIN JACK (Neem oil)  | - Organic, can be used on fruits and vegetables - 3 in 1 Insecticide, Fungicide, Miticide |
2. Grow disease-resistant varieties
An alternative to using fungicide is to grow rose cultivars that are genetically resistant to the Black Spot fungus.
Black spot-resistant hybrid tea roses:
· Auguste Renoir (pink blooms)
· \Cary Grant (orange and red blooms)
· Cayenne (red blooms)
· Granada (pink flowers with red overtones)
· Lady Rose (deep pink blooms)
· Mikado (red blooms with yellow overtones)
· Miss All-American Beauty (deep pink, 6-inch across large blooms)
· Peace (white with yellow overtones and pink petal margins)
· Princess of Monaco (white with pink petal margins)
· Sheer Bliss (white with light pink center)
· Sunbright (yellow blooms)
· Tiffany (light pink blooms)
Black spot-resistant shrub/hedge roses:
· Baby Love
· Carefree Delight
· Knock Out
· Robusta
Black spot-resistant climbing roses:
· John Davis rose
· New Dawn
· Eden
3. Remove infected leaves
It is necessary to prune and discard infected leaves from the plant and any fallen leaves that are infected to slow down the spread of infection to other plants, although this cannot completely eliminate the fungus in your garden.
4. Avoid wetting leaves
For preventive measures, it is important to avoid wetting the leaves when watering the plants especially during cloudy days when it takes longer to dry.
5. Space between plants
Do not plant too closely together or put too many pots in a small space.
Overlapping of leaves reduces the air circulation between the plants and prevent the leaf surfaces from drying out quickly after watering or the rain.
6. No fertilizers in propagation
Do not use fertilizers or “premium” grade potting soil that is mixed with fertilizer when propagating cuttings.
Cuttings with open wounds are very sensitive with minerals or soluble salts in water. Fertilizers contain high level of minerals and can thus easily burn the open wounds of the cuttings, making them more vulnerable to fungal infection.
After all, cuttings cannot absorb fertilizers because they do not have roots.
How to properly start roses from cuttings?
1. Stem selection
– The best time to produce cuttings is at the end of the blooming season which is around fall or early winter when the blooms have wilted, so that the stem is mature and is physiologically not focused on producing flowers.
– The stem should be semi-hardwood or mature wood which is semi-rigid that you can still bend a little. Semi-hardwood stems are mature new growths from the year you take the cuttings. The stems have matured by the end of the growing season in late fall.
– If you take growths from the previous year, the stems are too rigid. One way to test whether the wood is semi-hardwood is that you can bend it slightly.
– On the other hand, new growths that are harvested in summer or before fall are softwood stems. They are extremely flexible and are not suitable for propagation.
2. Preparation of cuttings
– Each cutting should be around 6–8 inches (15 -20 cm) long, with 3 to 4 nodes, which is about the thickness and length of a pencil.
– Coat the bottom tip of the cutting in powdered rooting hormone. Bury only the bottom bud in the substrate.
– If you will plant them directly into the soil without letting them callus, remove all the leaves except one pair at the top to prevent transpiring away too much moisture, and to save room. Remove the thorns that will come into contact with the soil. Prepare a sandy substrate and water it well till water comes out of the bottom drainage holes.
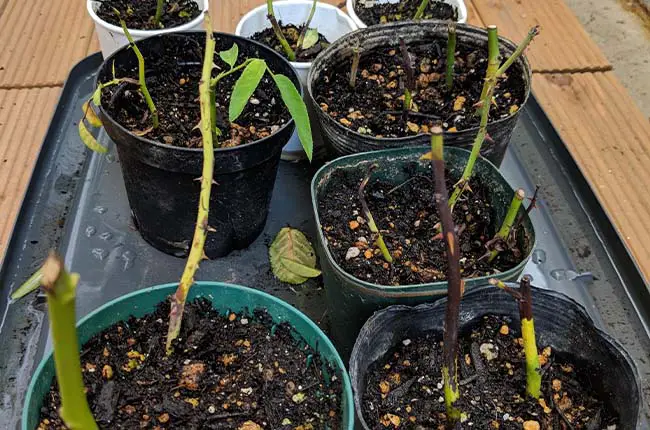
3. Callus the cuttings
– If you let the cuttings callus first before planting them in soil (which can increase the success in propagation and lower the risk of fungal infection), wrap 10-15 cuttings in a newspaper like a burrito.
– Alternatively, you can also put the cuttings without the newspaper inside a styrofoam box. Put the newspaper burritos or the styrofoam boxes inside a larger container or a larger plastic bag in which you spray some water. Close the lid of the container or the bag to maintain a humid environment inside.
– Close the larger container and wait for 1.5 to 2 months to check if the cuttings have callused.
– Once they have callused, pot them up in potting soil without fertilizer.
4. Prevent overwatering
Overwatering or an overly wet substrate is the main reason (If you plant the cuttings directly in a substrate, it should only be moist, but not wet, meaning that the top layer should look dry. Too much moisture breeds bacteria that can easily get to the new cuttings.
5. Soil temperature
The best time to propagate rose cuttings is late fall or early winter with temperatures between 40 to 60 Fahrenheit (5-15 Celcius).
Temperatures too high and too low are both not appropriate. Warm temperatures can breed black spot fungus.
If the temperature is too low, put the pots on top of a heat mat.
How long do rose cuttings take to root?
It takes between 4 to 8 weeks to root. Refrain from removing them from the soil too early as that can damage their fragile roots.
Conclusion
Roses are vulnerable to the Black Spot fungus, especially in warm, humid environments.
The best way to eliminate the problem is to apply fungicides. Infected leaves must be removed and overwatering must be prevented.
Happy gardening!
Related:
Why You Should Let Cuttings Callus (Must Read)

- Top 6 Drip Irrigation Systems for Raised Beds (2025) - January 31, 2025
- Top 10 Orchid Fertilizers: A Comprehensive Review (2025) - January 16, 2025
- Top 6 Slow-Release Fertilizers for Houseplants & Veggies (2025) - January 15, 2025